

Get the Most out of Your Flash Drive: Creating a Two Partition Hidden Bootable and Storage Flash Drive
Most people use flash drives for storage, but did you know that you can use it to boot a different operating system on your computer? Or to perform actions that Windows would otherwise block you from performing, like drive scans or disk checks while the operating system isn’t initialized?
This tutorial walks you through how to create a hidden bootable drive on your flash drive. With this hidden drive, you’ll have endless possibilities with the types of tools you could use on your computer. IT professionals and savvy tech users alike will have a new appreciation for their flash drives!
Requirements
To transform your flash drive, you’ll need the following:
- Basic Knowledge of navigating Windows directories.
- Basic knowledge of removable storage media.
- Hardware: Computer and Flash Drive.
Note: For this tutorial, I used a Kingston Datatraveler Elite – 32 GB Flash Drive.
- Software: Windows or Linux
- EaseUS Partition Master Free 10.8 (EaseUS)
- Bootice
- Sardu
Step 1: Partitioning the Flash Drive
To partition the flash drive into a storage drive and bootable drive, use EaseUS. With EaseUS, you’ll format the flash drive before creating and activating the partitions. To begin, insert the USB Flash Drive, open EaseUS, and follow the steps below.
Step 1.1: Format the Flash Drive to FAT32
- In EaseUS, click EaseUS Partition Master Free.
- Locate the flash drive and select it.
- In the toolbar, click Format.
- In the File System field, ensure FAT32 is selected. Leave defaults for the Partition Label and Cluster Size fields.
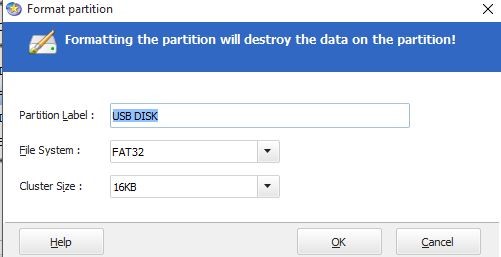
- Click OK.
- In the upper left toolbar, click Apply.
Note: Alternatively, among several other ways, formatting the flash drive can be done through the Windows format utility as a quick format.
Step 1.2: Split the Flash Drive into Two Partitions
- With the flash drive selected, click Resize/Move.
- Under “Decide size and position”, adjust the bar and partition size as desired to create two partitions: one storage partition, and one boot partition with unallocated space.
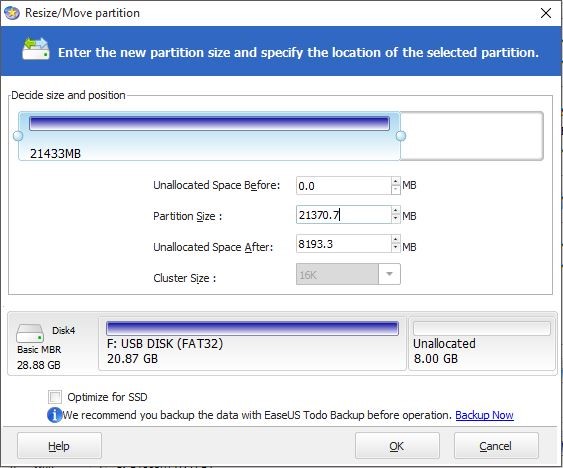
Note: For this tutorial, I’m using a flash drive with an advertised drive size of 32GB and breaking it up into a boot partition that’s approximately 8GB and a storage partition that’s approximately 20GB.
- Click OK.
- In the upper left toolbar, click Apply.
Step 1.3: Create the New Bootable Partition
- Select the boot drive with the unallocated space that you created in the previous step.
- In the upper center toolbar, click Create.
- In the warning that appears, click Yes.
- In the Partition Label field, name the partition as per your preference. For example, I labeled the partition, “Boot” for easy identification.
- For the Create As field, choose Primary.
- For the File System field, choose FAT32.
- Click OK.
- In the upper left toolbar, click Apply.
Step 1.4: Mark the Boot Partition Active
- Select the boot partition that you just created
- Click Set Active.
- Click OK.
- In the upper left toolbar, click Apply.
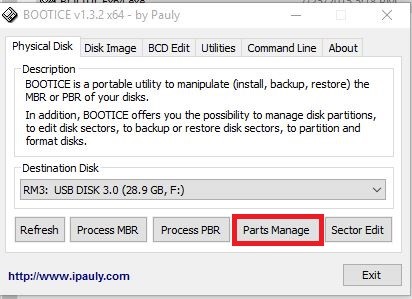
Step 2: Making the Boot Partition Accessible
To make the boot partition accessible so you can write boot files to it, you’ll use Bootice. Open Bootice to mark the partition as active and accessible by following the steps below.
Step 2.1: Mark the Bootable Partition Active
- In the destination disk drop down menu, select the flash drive, most likely labeled RM#.
- Click Parts Manage.
Step 2.2: Set the Bootable Partition as Accessible
- Select the Boot volume label or the partition you want to boot from. For me, it’s the 8GB partition labeled, Boot.
- Click Set Accessible.
- Click OK.
Step 3: Making the Partition Bootable
To make the partition bootable, you’ll write the utilities and distributions to the boot partition using Sardu. Open Sardu, click through the prompts, skip registration, and follow the steps below.
Note: There are several things you can do with Sardu. I’m only going to go over the Sardu functions that are necessary right now.
Step 3.1: Select the Bootable Linux Distributions or Utilities You Want to Install
- Click the download button to begin the download for your desired Linux distributions or utilities. Clicking download may not automatically select the file to be written to the drive.
- On the Downloads Page, click the Start button (the big arrow) to start the downloads manually.
Note: For ISO files, you can get them from a third party rather than downloading them through Sardu.
Step 3.2: Select the Utilities You Want to Install
Step 3.3: Make the Boot Partition Bootable
- Click the Search USB button.
- Click the drop down to select your flash drive.
- Click the Create USB button.
Step 4: Hide the Boot Partition by Marking the Storage Partition as Active
Re-open Bootice and make the storage partition active and accessible by following the steps below.
- From the drop-down menu, select the flash drive.
- Click Parts Manage.
- Set the storage partition as active.
Step 5: Use the Bootable Partition You Created
You’re ready to use the flash drive as a bootable drive! Before beginning, ensure “booting from USB” is enabled through your BIOS.
- With the flash drive in a USB port, restart your computer.
- As your computer boots up, press the F8 key once every second until the boot menu shows up, or press a computer specific key for boot options.
- Choose the bootable partition (being careful not to choose UEFI) you just created.
Step 6: Enjoy!